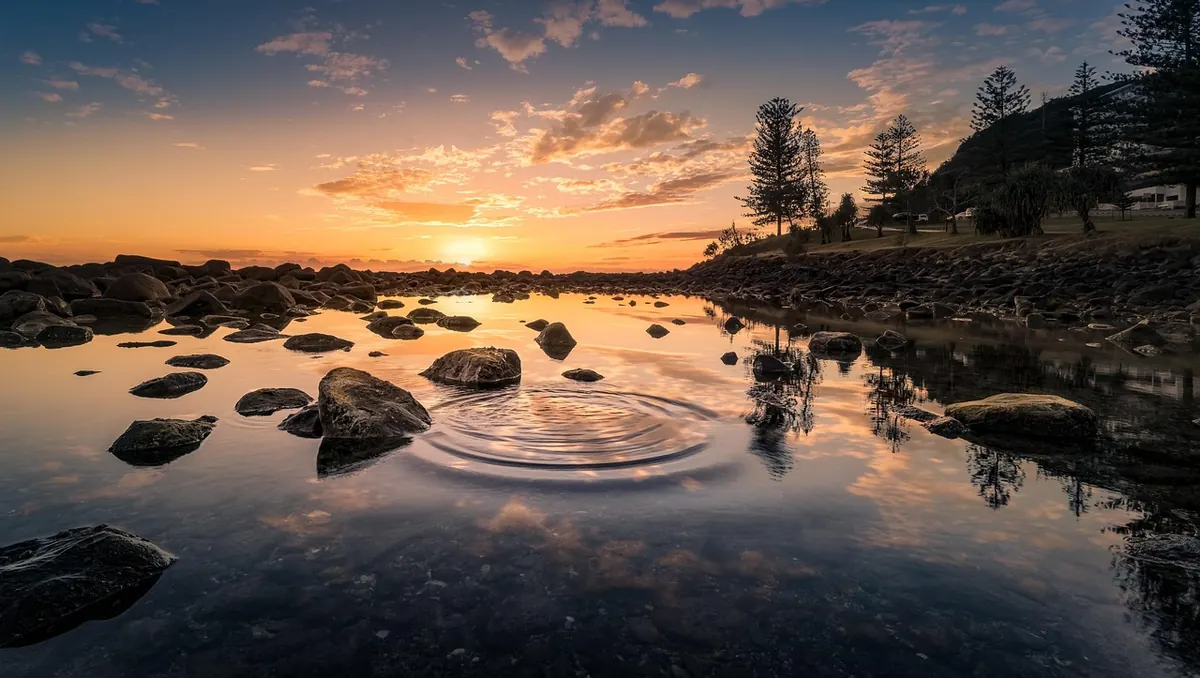
Every lake holds two photographs: the one above the water and the one below it. On a still morning the second can outshine the first — hills stacked on their own image, reeds repeating upside down, a heron doubled into a grey smudge, a cloud drifting through a sky you could wade into. Reflections are the reason photographers set alarms for four in the morning and stand shivering in wet grass, and they are also the reason so many of those photographs end up flat, muddy and quietly disappointing. The difference is almost never the location. It is composition and glass: how you frame the mirror, and whether you understand the one filter that controls it.
Why Reflections Are So Compelling
A reflection is not merely a copy. It is a second image with its own light, its own contrast and its own mood. The water rarely returns the scene perfectly: it darkens the reflection by roughly half a stop to a full stop, softens detail through faint surface movement, and tints everything with whatever colour the lake itself carries — peat brown, glacial turquoise, morning gold.
That imperfection is the point. When you photograph a reflection, you are photographing two versions of the same place at once: the sharp, literal world above and the softer, more painterly world below. The tension between them is what gives these images their pull. Your job as a photographer is to decide how much of each you want, and to make that decision deliberately rather than by accident.
Reading the Water Before You Unpack
Most reflection photographs are lost before the tripod is even set. Conditions decide everything, so spend the first five minutes simply looking at the surface.
Wind, fetch and the glass window
Perfect mirror reflections require still air. Wind direction matters as much as wind speed: a lake with a long open fetch to the west will ripple the moment a westerly picks up, while a sheltered bay ringed by trees can stay glassy for an hour longer. On breezy days, hunt for lee shorelines, narrow inlets, the shadowed side of an island, and the calm strip immediately beneath a steep bank.
Calm windows are short. The hour around sunrise is the classic, but dawn often brings a brief breath of wind just as the light turns good, and lakes can flatten again at dusk as the land cools. Check the forecast for gust speed, not just average wind, and be ready to shoot the moment the surface goes flat rather than waiting for the light to become perfect.
Light direction and the shape of the sky
Reflections are brightest and cleanest when the subject is front-lit. Put the sun behind you and the far shore is lit, the reflection is lit, and both halves of the frame carry detail. Side light can be dramatic, raking across the scene and splitting the reflection into brighter and darker zones, but it also flattens the far shore into silhouette. Backlight — shooting into the sun — turns the lake into a sheet of silver glare, which can be beautiful if you want a high-key, minimal image, but useless if you want to see the reflected hills.
Clouds matter too. A featureless blue sky reflects as a featureless blue band, adding nothing. Broken cloud, mist, or a low band of warm light along the horizon gives the reflection structure to repeat.
Composition: Making the Mirror Work
Start with a clean line
The shoreline is your horizon, and it must be level. A tilted waterline reads as an obvious mistake even to viewers who cannot say why the picture feels wrong. Use the camera's electronic level, and if you are hand-holding at the water's edge, check the bubble twice.
Break the symmetry — on purpose
A perfectly mirrored frame split 50/50 down the middle is elegant once and monotonous in a portfolio. Try these variations instead:
- Occupy one third. Give the sky and land two-thirds of the frame and let the reflection hold the bottom third, or invert it so the reflection dominates.
- Interrupt the mirror. A single rock, a tuft of grass, a swimming bird or a fallen log breaks the symmetry and gives the eye an anchor.
- Stretch the reflection. Get very low — lens almost touching the water — and the reflected image elongates, filling more of the frame with its softer, more abstract texture.
- Shoot through the reflection. In shallow, clear water you can compose so that submerged stones, weed and fish sit behind the reflected clouds, layering three worlds in one frame.
- Use a frame within a frame. Overhanging branches, reeds or a boat hull at the edge of the frame enclose the mirrored scene and add depth.
A reflection also gives you a second set of leading lines. Lines that converge toward the horizon above the water — a jetty, a river mouth, a ridge — will often converge in the reflection too, doubling the pull toward your subject. Look for those echoes and place them off-centre so the two sets of lines do not simply cancel each other out.
If the reflection is sharper and more interesting than the landscape above it, consider flipping the composition — sometimes the mirrored world deserves the top two-thirds of the frame.
The Polarising Filter: Your Most Important Tool
No accessory changes a lake photograph more than a circular polarising filter (CPL). It is not a magic "make colours pop" button; it is a controllable shutter on reflected light, and knowing exactly what it does is the difference between using it well and ruining a shot with it.
What a CPL actually does
Light bouncing off a non-metallic surface — water, wet rock, foliage, glass — becomes partially polarised. A polariser is a rotating grid that blocks light vibrating in one plane. Turn the filter so that grid is aligned against the glare and the glare disappears; turn it 90 degrees and the glare returns.
For lake photography this gives you a choice between two completely different pictures:
- Rotate to kill the glare and you see into the water — stones, weed, submerged timber, the shadow of your own tripod. Reflections of the sky vanish, the water darkens, and colour saturates.
- Rotate to keep the glare and every drop of light bouncing off the surface survives intact. The mirror reflection stays bright and graphic.
Beginners usually dial in maximum polarisation by reflex and then wonder why their mirror-still lake looks like a murky puddle. If the reflection is the photograph, back the filter off until the reflection returns, or take it off entirely.
Dialling it in
- Set the camera to live view or compose through the viewfinder, then rotate the filter ring slowly while watching the surface.
- Polarisation is strongest when the sun is at roughly 90 degrees to your line of sight — at your left or right shoulder, not behind you and not directly ahead. At sunrise or sunset the effect weakens to nearly nothing.
- Change your shooting direction and you must re-dial the filter. It is not a set-and-forget accessory.
- With wide-angle lenses, expect uneven polarisation: one corner of the sky will go deep blue while the opposite side stays pale. Either accept it, narrow the field of view, or use a graduated ND filter instead.
- Expect to lose one to two stops of light. That is often a bonus on a bright morning — it lets you slow the shutter for smoother water.
When to leave it off
Skip the polariser when you want maximum reflected brightness, when you are shooting into the sun and risk a colour cast, when you are at very wide focal lengths and need even coverage, or when you are stacking filters and vignetting becomes obvious. A cheap CPL on a good lens will cost you sharpness; buy the best one you can afford, and never stack it directly with a UV filter.
A Simple Field Routine
- Arrive early. Be in position 30 to 45 minutes before sunrise so you can watch the lake settle.
- Survey the shoreline. Walk it. Find the best foreground object, the cleanest reflected skyline and the most sheltered water.
- Set a low, stable platform. Tripod legs in the shallows, centre column down, feet pressed firmly into gravel or mud.
- Level the horizon. Check the spirit level or electronic level before every major recomposition.
- Choose your polariser setting consciously. Decide whether you are shooting the surface or through it.
- Expose for the highlights. Reflections of a bright sky are often the brightest thing in the frame; protect them and lift the shadows later.
- Focus at a moderate distance — around 10 to 20 metres at f/8 to f/11 gives you both the shoreline and the reflected image acceptably sharp.
- Shoot the shutter speed you actually want. A fast shutter freezes tiny ripples into texture; a two- to four-second exposure smooths the water into glass and softens the reflection into a wash of colour.
Common Mistakes and Quick Fixes
- Dead-centre horizon. Move it off the midline and let one half dominate.
- Full polarisation on a mirror lake. Give the reflection back its light.
- Bright sky, black land. Use a graduated ND filter or bracket and blend.
- Ripples ruining the mirror. Wait, move to a lee shore, or embrace the texture with a longer exposure.
- Boring foreground. Get lower, step sideways, find a rock, a reed or a curve to anchor the bottom of the frame.
Finishing the Image
Reflections benefit from gentle treatment. Bring the highlights of the reflected sky down slightly rather than the whole image, and treat the two halves of the frame separately with gradients — the water usually needs less contrast and a touch more saturation, while the land above may need clarity and shadow recovery. Resist the urge to make the reflection as punchy as the landscape; its softness is what makes it read as water rather than as a second, pasted-on sky.
Above all, slow down. A lake rewards patience more than any other landscape subject: the glassy minutes are brief, and they rarely arrive when you expect them. Get there early, watch the surface, decide what the water is for — a mirror, a window or a texture — and then let the polariser and your framing do the rest.
Photo: strikers / Pixabay